partners for life
JobKeeper Reporting and Payroll Setup
While there is still more information and guidance to come from the ATO regarding ongoing reporting of JobKeeper payments and eligibility, it is important that your payroll reporting processes are current and set up correctly. We can handle your JobKeeper Reporting Setup, however if you would prefer to do it yourself, we have prepared the following guidance to assist you. If you are reporting payroll using Single Touch Payroll (STP) through your accounting software, please ensure you are reporting this correctly. Instructions for Xero, MYOB Essentials and MYOB AccountRight Live are below for your information.
Click on your Accounting Software Below:
Processing JobKeeper Payments using Xero
![]()
A JobKeeper allowance pay item has been automatically created for you. By default, the allowance type for the Xero generated pay item is ‘JobKeeper – JobKeeper Payment top ups’, and it’s exempt from Superannuation Guarantee.
1 Setup Instructions
You can either use the pay item in your employees’ pay templates or payslips so they are reported to the ATO in the required format.
View the pay item or make certain changes to it, if needed.
- Click on the organisation name, select Settings, then click Payroll settings.
- Select the Pay Items tab, then select Earnings.
- From the list of Earnings pay items, click on the Xero generated pay item called JobKeeper payment top up.
- Update details, if needed. The following pay item settings are automatically set and can’t be changed:
- Rate type is set to Fixed Amount
- The Exempt from PAYG Withholding checkbox is set as unchecked
- The Reportable as W1 on Activity Statement checkbox is set to checked
- (Optional) Clear the Exempt from Superannuation Guarantee Contribution checkbox, if you want to contribute super payments.
- Click Save.
You can also create an additional pay item, for instance, if you want one for calculating the Superannuation Guarantee and one that doesn’t.
- Click on the organisation name, select Settings, then click Payroll settings.
- Select the Pay Items tab, then select Earnings.
- Click Add, then select Allowance.
- Under Type, select JobKeeper – JobKeeper Payment top ups. This ensures that it’s reported correctly with the ATO.
- Enter an earnings name such as ‘JobKeeper top up (with super)’, and select the relevant Expense Account.
- (Optional) Update the amount.
- (Optional) Select the Exempt from Superannuation Guarantee Contribution
- Click Add.
2 Assign the JobKeeper pay item to an employee
Once you’ve set up or edited a JobKeeper pay item, you can assign it to multiple employees. If you’ll pay employees the JobKeeper payment on an ongoing basis, add this pay item to their pay templates, and enter a rate of zero. You can then calculate the exact amount on each employee’s payslip.
If the JobKeeper payment is only being made to employees once or twice, add the pay item directly to the employee’s payslip.
3 Record a JobKeeper payment for an employee
- In the Payroll menu, select Pay Employees.
- Click Add Pay Run, select a pay period, then click Next.
- Click the employee’s name to open their payslip.
- Check your employee’s usual earnings lines are correct. If applicable, you can add employee stand down hours.
- Click Add Earnings Line to add the JobKeeper pay item. If you already added this to the employee’s pay template, skip to step 7.
- Under Earnings Rate, select the new earnings pay item created above, then click OK.
- In the earnings line for the JobKeeper payment top up, enter the fixed amount. See the ATO’s website for more information on paying your eligible employees.
- Click Save.
Repeat the steps above for each employee as required, then post the pay run and file it with STP by the payment date.
4 Set JobKeeper payment start dates
Take care when setting the start date in the steps below. Once you click Save for reporting, the start date is locked and can’t be undone.
- In the Payroll menu, select Pay Employees.
- In the Payroll support during COVID-19 message, click visit our Payroll support page.
- Select the JobKeeper settings tab at the top of the page.
- Next to an employee’s name, click Start JobKeeper. If the details under an employee’s name are red, edit them using the steps in the section below.
- Under JobKeeper start date, select the applicable ATO fortnight.
- You can determine which fortnight to select based on the Payment Date of the pay run that the employee should start to receive top-ups. E.g. if the payment date is 1 April, select the ATO fortnight that spans 30 March to 12 April.
- You can’t select an ATO fortnight in the future. You can only select a current or past fortnight.
- Carefully review the selected ATO fortnight. Once you save the start date, it can’t be undone. When you’re ready, click Save for reporting.
You should repeat these steps for other eligible employees. The employee JobKeeper start dates will be sent to the ATO when you next file with STP.
Warning: If you have selected incorrect JobKeeper start dates for any employee, stop immediately, don’t file STP, and contact Xero Support.
When you review a pay run, you’ll see a note on the payslips of nominated employees to remind you they’re enrolled for JobKeeper payments. The note won’t be visible when you send the payslips to employees.
5 Process pay runs for payments missed in April
About payments missed in April
You can use unscheduled pay runs to pay employees the JobKeeper top ups you missed in April. You need to review pay runs with payment dates from 30 March to identify the employees who need a top-up. You can then calculate the top-up amounts to pay eligible employees (ATO website).
Payment dates for these unscheduled pay runs must be on or before 26 April (weekly or fortnightly pay periods) or 30 April (monthly pay periods). This ensures the correct earnings are reported to the ATO for the first two fortnights (30 March – 12 April, 13 April – 26 April).
When creating the unscheduled pay run, the payroll calendar, financial year and unscheduled pay period should match those used in the pay run with the missed payment.
Process an unscheduled pay run
- In the Payroll menu, select Pay Employees.
- Click Add a Pay Run, then select Unscheduled pay run.
- Select a payroll calendar, financial year and unscheduled pay period, then click Next. Make sure the details are the same as the pay run with the missed payment.
- Click Payment Date, select the actual date you’ll pay the JobKeeper top ups, then click Save.
- In the Included column, select the employees to include in the pay run.
- Click an employee’s name to open their payslip.
- Under each Earnings Rate, remove or zero out the default earnings line.
- Click Add Earnings Line to add the JobKeeper pay item. If you already added this to the employee’s pay template, skip to step 10.
- Under Earnings Rate, select the new JobKeeper earnings pay item, then click OK.
- In the earnings line for the JobKeeper top up, enter the fixed amount. See the ATO’s website for more information on paying your eligible employees.
- Review the lines under Tax Type, Superannuation Fund and Leave Type to make sure they’re accurate, then click Save.
Repeat the steps above for each employee as required, then post the pay run and file it with STP. You’ll also need to repeat this process for each applicable pay period.
Processing JobKeeper Payment using MYOB Essentials
![]()
Once you’ve completed the enrolment process with the ATO, you can set up AccountRight. First, let’s establish the JobKeeper payment amounts you’ll need to pay (before tax) based on an employee’s pay frequency:
| Pay Frequency | JobKeeper payment amount | Calculation |
|---|---|---|
| Weekly | $750 | 1500/2 |
| Fortnightly | $1500 | 1500/1 |
| Twice a month | $1625 | 1500 x 26/24 |
| Monthly (average) | $3250 | 1500 x 26/12 |
Also, how you manage these payments in AccountRight depends on an employee’s scenario.
| If an employee is | You'll need to |
|---|---|
| being paid less than the JobKeeper payment | Pay them the full JobKeeper payment. This means you'll pay them in the same way you currently do, plus you'll pay them a top-up to bring their taxable gross up to the JobKeeper payment amount. You can choose whether or not to pay superannuation on the top-up amount. |
| being paid more than the JobKeeper payment | Pay them in the same way you currently do. |
| stood down (still employed but not working) | Pay them the full JobKeeper payment. You can choose whether or not to pay superannuation on this payment. Leave is required to accrue on this payment (see the FAQ below for more details). |
To help account for the JobKeeper payments in AccountRight, you’ll need to set up:
- a new income account – this will account for the JobKeeper payments you receive from the government
- two new payroll wage (allowance) categories – you’ll assign these to your employees so their JobKeeper payments are reported correctly to the ATO via Single Touch Payroll
You might also need to create another wage category if you need to stop an employee’s JobKeeper payments prior to the end of the scheme. See the FAQs below for details. But don’t worry, we’ll step you through each of the setup tasks, and explain how to make the JobKeeper payments to your employees. If our solution below doesn’t meet your needs, you might need to discuss your options with your MYOB Partner or an accounting advisor.
Our examples are based on simple scenarios.
There are lots of different agreements and awards specifying employee conditions and entitlements. If our approach doesn’t suit your business needs, please get in touch with an MYOB Partner or accounting advisor.
1 Set up an income account to receive JobKeeper payments.
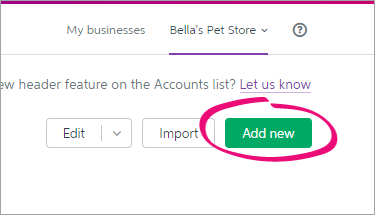
- Click your business name and choose Accounts list.
- Click Add new. The Add new box appears, in the Accounts tab.
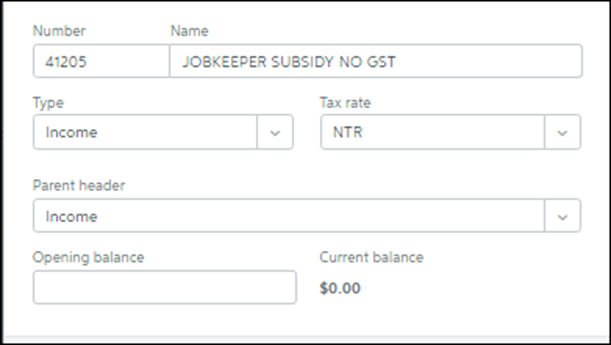
- Enter a unique Account Number.
Don’t use your real account number for bank and credit card accounts. The number you enter here is only used for tracking the account in MYOB Essentials. You don’t need to use your real bank or credit card account number.
- Enter the Account Name as JOBKEEPER SUBSIDY NO GST.
- Choose Income from the Account Type
- Choose NTR from the Tax Rate
- Click Save to add the accounts.
Here’s our example:
2 Set up the JobKeeper pay items
You can now set up the required pay items to ensure JobKeeper payments are reported correctly to the ATO. You’ll need to set up pay items for:
- JobKeeper top-up – this is for employees earning less than the JobKeeper payment amount, or they’ve been stood down, who must be paid a top-up to bring their taxable gross to $1,500 per fortnight.
- JobKeeper start – this is for all employees to let the ATO know when you’ve started paying an employee JobKeeper payments.
You only need to set up these pay items once.
Make sure you name these pay items exactly as described below. It’s critical to enter the names exactly as defined by the ATO. Any changes may delay reimbursements.
Set up the JobKeeper TOPUP pay item
- Go to the Payroll menu and choose Employees.
- Click the employee’s name.
- Click the Pay items – earnings & deductions
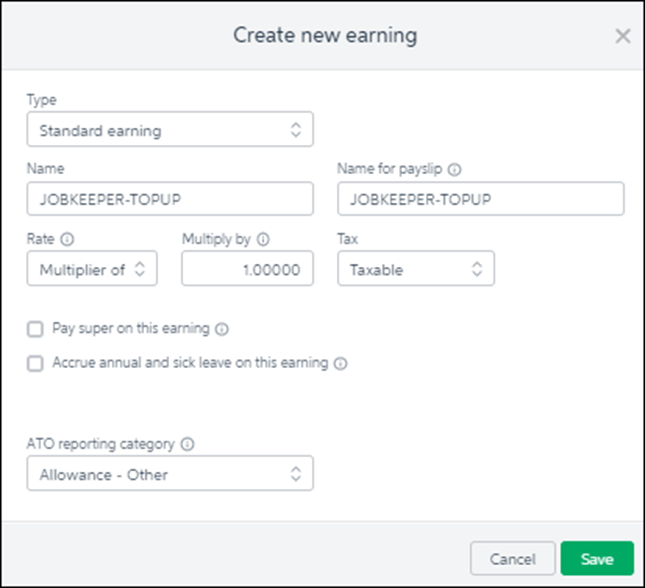
- Under Earnings, add a new earning called JOBKEEPER-TOPUP.
- For the Rate, choose Multiplier of normal rate.
- Enter a value of 1 in the Multiply by field.
- As the JobKeeper amount will be considered part of the employee’s PAYG income, choose Taxable in the Tax
- Decide whether you need to Pay super on this earning.
As per the government’s information, you must pay super on an employee’s regular pay amount, but you can choose whether to pay super on top-up amounts.
Take a look at these examples for fortnightly paid employees:
| Regular fortnightly income | Fortnightly income with JobKeeper | You must pay super on | You can choose to pay super on |
|---|---|---|---|
| $1000 | $1500 | $1000 | $500 |
| $1500 | $1500 | $1500 | N/A |
| $3000 | $3000 | $3000 | N/A |
- Decide whether you need to Accrue annual and sick leave on this earning. If you’re not sure, consult your MYOB Partner or accountant.
- Choose Allowance – Other for the ATO reporting category.
- Click Save. The new earning is now listed for the employee. Here is our example pay item:
- Click Save to save your changes to the employee.
- Click the name of another employee that will receive JobKeeper.
- Click the Pay items – earnings & deductions tab.
- Under Earnings, choose the JOBKEEPER-TOPUP pay item.
- Click Save.
- Repeat steps 14 to 15 for every employee that will be receiving JobKeeper.
Set up the JobKeeper START pay item
- Go to the Payroll menu and choose Employees.
- Click the employee’s name.
- Click the Pay items – earnings & deductions tab.
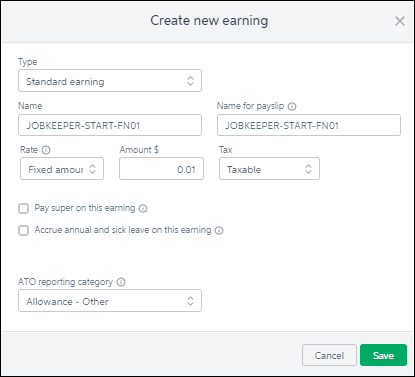
- Under Earnings, add a new earning called JOBKEEPER-START-FNxx, where xx refers to the fortnightly period you start making JobKeeper payments (see the following table for help).
For example, if you’re paying your employee their first JobKeeper payment on 11 April, use JOBKEEPER-START-FN01 as the pay item (as the pay date falls within the ATO’s fortnightly period). The pay item name must match this (all capitals, with hyphens and no spaces) to ensure it’s accepted by the ATO for Single Touch Payroll reporting. See the following table for help.
| FN | If your pay date falls within | The pay item Name must be |
|---|---|---|
| 01 | 30/03/2020 - 12/04/2020 | JOBKEEPER-START-FN01 |
| 02 | 13/04/2020 - 26/04/2020 | JOBKEEPER-START-FN02 |
| 03 | 27/04/2020 - 10/05/2020 | JOBKEEPER-START-FN03 |
| 04 | 11/05/2020 - 24/05/2020 | JOBKEEPER-START-FN04 |
| 05 | 25/05/2020 - 07/06/2020 | JOBKEEPER-START-FN05 |
| 06 | 08/06/2020 - 21/06/2020 | JOBKEEPER-START-FN06 |
| 07 | 22/06/2020 - 05/07/2020 | JOBKEEPER-START-FN07 |
| 08 | 06/07/2020 - 19/07/2020 | JOBKEEPER-START-FN08 |
| 09 | 20/07/2020 - 02/08/2020 | JOBKEEPER-START-FN09 |
| 10 | 03/08/2020 - 16/08/2020 | JOBKEEPER-START-FN10 |
| 11 | 17/08/2020 - 30/08/2020 | JOBKEEPER-START-FN11 |
| 12 | 31/08/2020 - 13/09/2020 | JOBKEEPER-START-FN12 |
| 13 | 14/09/2020 - 27/09/2020 | JOBKEEPER-START-FN13 |
- Here’s our example pay item:For the Rate, choose Fixed amount.
- Enter a value of $0.01 in the Amount
- Choose Taxable in the Tax
- Leave the options, Pay super on this earning and Accrue annual and sick leave on this earning
- Choose Allowance – Other for the ATO reporting category.
Here’s our example pay item:
- Click Save. The new earning is now listed for the employee.
- Click Save to save your changes to the employee.
- Click the name of another employee that will receive JobKeeper.
- Click the Pay items – earnings & deductions
- Under Earnings, choose the JOBKEEPER-START-FNxx pay item.
- Click Save.
- Repeat steps 12 to 15 for every employee that will be receiving JobKeeper.
If an employee becomes ineligible during the JobKeeper scheme, you’ll need to create a new pay item to inform the ATO. See the FAQs below for details.
3 Do your first pay under JobKeeper
The first pay you complete under the JobKeeper scheme will look quite similar to any other pay day, but with these changes:
- You’ll enter $0.01 against the JOBKEEPER-START-FNxx pay item for each employee you’re paying.
- You’ll increase the PAYG by 1 cent to balance the pay.
- If you’re paying an employee who’s earned less than the JobKeeper payment, or the employee has been stood down, you’ll enter a value against the JOBKEEPER-TOPUP pay item.
Let’s take you through it:
- From the Payroll menu, choose Enter pay. The Pay centre page appears.
- Under Confirm dates:
- In the How often field, choose the pay frequency. For example, if it’s a weekly pay, choose Weekly.
- In the From and To fields, chose the first and last day of the pay period.
- Choose the Pay on date. This is typically the day you’re processing the pay run.
- Under Select employees to pay:
- Select the employees you’re paying.
- Click in the Email column to select which employees you want to email payslips to. You’ll need to have entered their email addresses on the Employee details tab of their employee record to be able to email their payslip. A tick shows in the Bank File column if the employee is being paid electronically.
- Under Pay run, click Start pay run . The Pay run page appears where you can review the pay details. On the Pay run page, enter the number of paid hours against the JobKeeper pay item and reduce their Normal hours by the same amount:
Here’s some examples:
| If an employee is | Do this |
|---|---|
| being paid less than the JobKeeper payment | Enter the hours for the work they've done against normal. Enter the top-up hours against the JOBKEEPER-TOPUP pay item to bring their pay up to the required JobKeeper payment amount. |
| being paid more than the JobKeeper payment | Enter their hours as you normally would against Normal. |
| stood down | Enter the full JobKeeper payment against the JOBKEEPER-TOPUP pay item. |
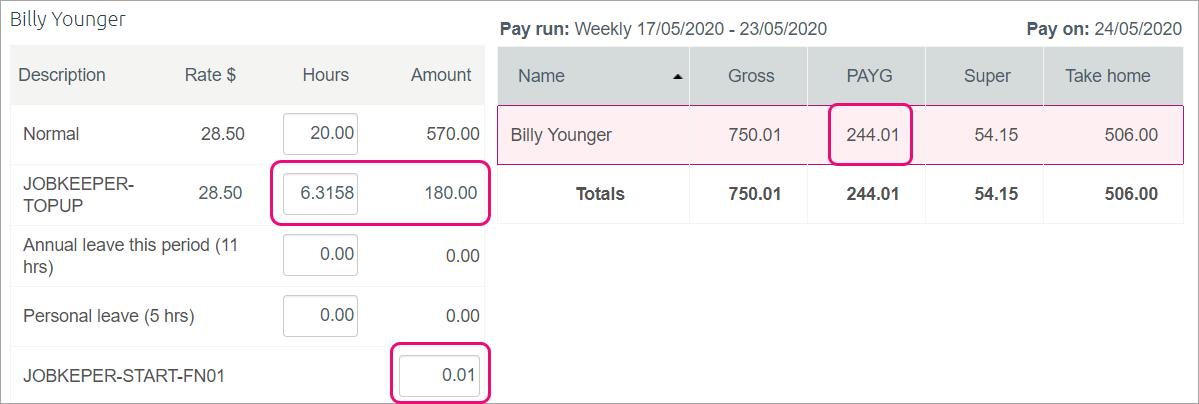
Example 1: Employee paid less than $750 a week
Here’s an example of a casual employee who works 20 hours per week and whose pay is less than the JobKeeper amount ($750). For their 20 hours they earn $570.00 a week. Under JobKeeper, they’ll now earn $750 a week so we’ve put their extra $180.00 against the JOBKEEPER-TOPUP pay item. To do this, we need to work out how many hours $180.00 represents by dividing it by the employee’s pay rate (180.00 / 28.50 = 6.3158).
Because this is their first JobKeeper payment, the JOBKEEPER-START pay item is also included in their pay with a value of $0.01 against it. To balance the pay, we also increase the PAYG by 1 cent ($244.00 + $0.01 = $244.01)
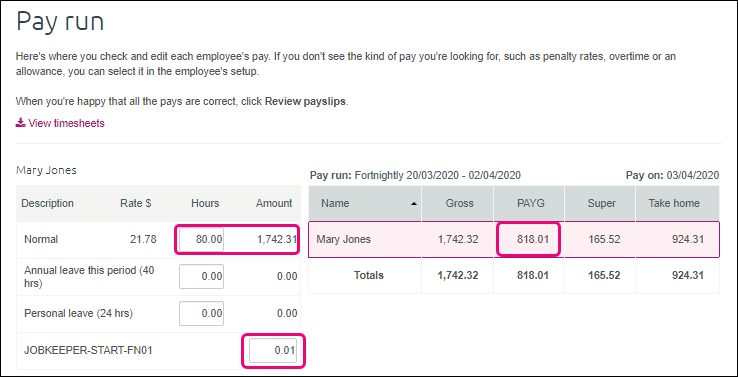
Example 2: Employee paid more than $1500 per fortnight
Here’s an employee whose weekly pay is more than the fortnightly JobKeeper amount ($1500). They normally earn $1742.31 a fortnight. Under JobKeeper, they’ll still be paid the same.
So we’ll enter their pay as we normally would and record their hours against Normal.
But because it’s the first pay they’re receiving under the JobKeeper scheme, the JOBKEEPER-START pay item is also included in their pay with a value of $0.01 against it (after doing this first pay for them, we’ll need to unlink the JOBKEEPER-START pay item from the employee). To balance the pay, we also increase the PAYG by 1 cent ($818.00 + $0.01 = $818.01)
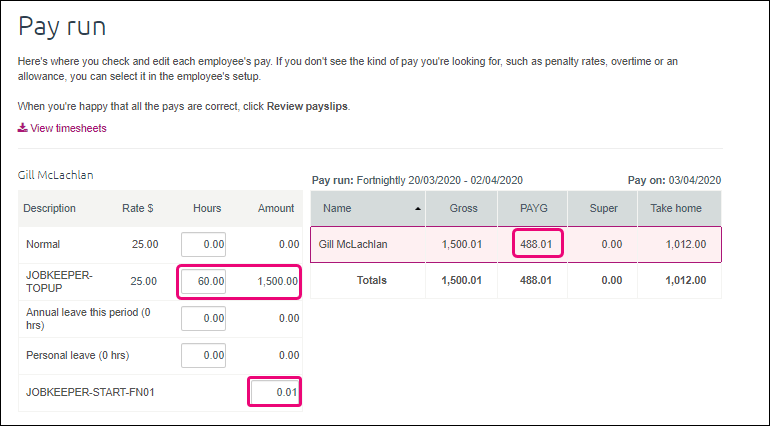
Example 3: Employee who is stood down
Here’s an employee who has been stood down. Regardless of what they were earning while working, they’ll now receive the full JobKeeper payment.
So in their fortnightly pay we’ll enter $1500 against the JOBKEEPER-TOPUP pay item. To do this, we need to work out how many hours $1500 represents by dividing it by the employee’s pay rate (1500 / 25 = 60).
We’ll record zero hours against Normal and any other pay items.
And because it’s the first pay they’re receiving under the JobKeeper scheme, we’ll enter $0.01 against the JOBKEEPER-START pay item. To balance the pay, also increase the PAYG by 1 cent ($488.00 + $0.01 = $488.01).
After entering the JobKeeper amount and adjusting the employee’s Normal amount, complete the rest of the pay run as normal.
After an employee’s first JobKeeper pay
If you’ve submitted the employee’s first JobKeeper pay to the ATO via Single Touch Payroll reporting, you can unlink the JOBKEEPER-START pay item from them.
Like this:
- Go to the Payroll menu and choose Employees.
- Click the employee’s name.
- Click the Pay items – earnings & deductions
- Under Earnings, click the ellipsis button next to the JOBKEEPER-START pay item and choose Unlink from employee.
- Click Save to save your changes to the employee.
- Repeat from step 2 for all other employees that you’ve submitted their first JobKeeper pay for.
You will now be able to process subsequent pays in a similar way to the first pay, but without using the JOBKEEPER-START pay item.
4 Receive JobKeeper payments from the government
The JobKeeper payments from the government will be deposited into your nominated bank account. Here’s how to record those payments in MYOB Essentials.
If you use bank feeds: The deposits from the government will appear in MYOB Essentials when your bank feed transactions appear.
- If you’ve already recorded a Receive Money transaction for the deposit (as described below), you can match the bank feed transaction to it.
- If you haven’t already recorded a Receive Money transaction for the deposit, you can allocate the deposit to your wages expense account (the same account your wages are paid from). For details about how to do this, see Allocating bank transactions.
If you don’t use bank feeds, you’ll need to manually record a Receive Money transaction.
Processing JobKeeper Payments using MYOB AccountRight Live
![]()
Once you’ve completed the enrolment process with the ATO, you can set up AccountRight. First, let’s establish the JobKeeper payment amounts you’ll need to pay (before tax) based on an employee’s pay frequency:
| Pay Frequency | JobKeeper payment amount | Calculation |
|---|---|---|
| Weekly | $750 | 1500/2 |
| Fortnightly | $1500 | 1500/1 |
| Twice a month | $1625 | 1500 x 26/24 |
| Monthly (average) | $3250 | 1500 x 26/12 |
Also, how you manage these payments in AccountRight depends on an employee’s scenario.
| If an employee is | You'll need to |
|---|---|
| being paid less than the JobKeeper payment | Pay them the full JobKeeper payment. This means you'll pay them in the same way you currently do, plus you'll pay them a top-up to bring their taxable gross up to the JobKeeper payment amount. You can choose whether or not to pay superannuation on the top-up amount. |
| being paid more than the JobKeeper payment | Pay them in the same way you currently do. |
| stood down (still employed but not working) | Pay them the full JobKeeper payment. You can choose whether or not to pay superannuation on this payment. Leave is required to accrue on this payment (see the FAQ below for more details). |
To help account for the JobKeeper payments in AccountRight, you’ll need to set up:
- a new income account – this will account for the JobKeeper payments you receive from the government
- two new payroll wage (allowance) categories – you’ll assign these to your employees so their JobKeeper payments are reported correctly to the ATO via Single Touch Payroll
You might also need to create another wage category if you need to stop an employee’s JobKeeper payments prior to the end of the scheme. See the FAQs below for details.
But don’t worry, we’ll step you through each of the setup tasks, and explain how to make the JobKeeper payments to your employees. If our solution below doesn’t meet your needs, you might need to discuss your options with your MYOB Partner or an accounting advisor.
Our examples are based on simple scenarios.
There are lots of different agreements and awards specifying employee conditions and entitlements. If our approach doesn’t suit your business needs, please get in touch with an MYOB Partner or accounting advisor.
1 Set up an income account to receive JobKeeper payments.
We’ll start by creating an income account for the JobKeeper payments you receive.
- Go to the Accounts command centre and click Accounts List.
- Click the Income
- Click New. The Account Information window appears.
- Enter an Account Number which suits your accounts list.
- Enter the Account Name as JOBKEEPER SUBSIDY (NO GST).
- Here’s our example:
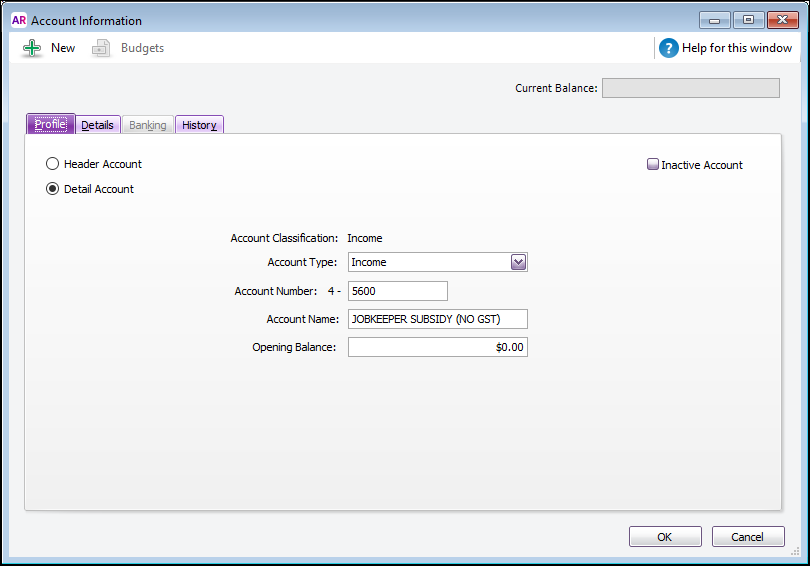
- Here’s our example:
- Click the Details tab and choose N-T as the Tax Code.
- Click OK.
2 Set up the JobKeeper wage (allowance) categories.
You can now set up the required payroll wage categories to ensure JobKeeper payments are reported correctly to the ATO.
You’ll need to set up a payroll wage category for:
- JobKeeper top-up – this is for employees earning less than the JobKeeper payment amount, or they’ve been stood down, who must be paid a top-up to bring their taxable gross to $1,500 per fortnight.
- JobKeeper start – this is for all employees to let the ATO know when you’ve started paying an employee JobKeeper payments.
You only need to set up these wage categories once.
Make sure you name these wage categories exactly as described below. It’s critical to enter the names exactly as defined by the ATO. Any changes may delay reimbursements.
To set up the JOBKEEPER-TOPUP wage category
- Go to the Payroll command centre and click Payroll Categories.
- On the Wages tab, click New. The Wages Information window appears.
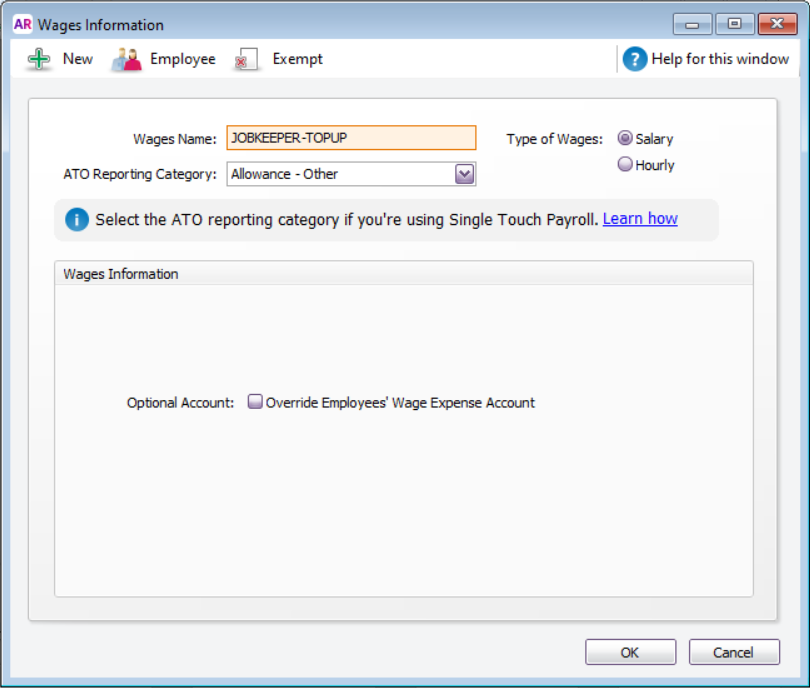
- For the Wages Name, enter this exact name: JOBKEEPER-TOPUP. The wage category name must match this (all capitals, with a hyphen and no spaces) to ensure it’s accepted by the ATO for Single Touch Payroll reporting.
- For the Type of Wages, select the Salary option (regardless of whether your employees are salaried or hourly based).
- For the ATO Reporting Category, choose Allowance – Other. This is required by the ATO to ensure the payments are reported correctly through Single Touch Payroll reporting.
Here’s our example:
Optional expense account
If you want to account for your JobKeeper top-up payments separately, you can create an expense account. You can then select the option Override Employees’ Wage Expense Account in the wage category and choose the new expense account. Check with your MYOB Partner or accounting advisor if you’re not sure if this is suitable for your business.
- Click Employee, select the employees you’ll be paying during the JobKeeper scheme, then click OK.
- Click OK to save the wage category.
To set up the JOBKEEPER-START-FNxx wage category
- Go to the Payroll command centre and click Payroll Categories.
- On the Wages tab, click New. The Wages Information window appears.
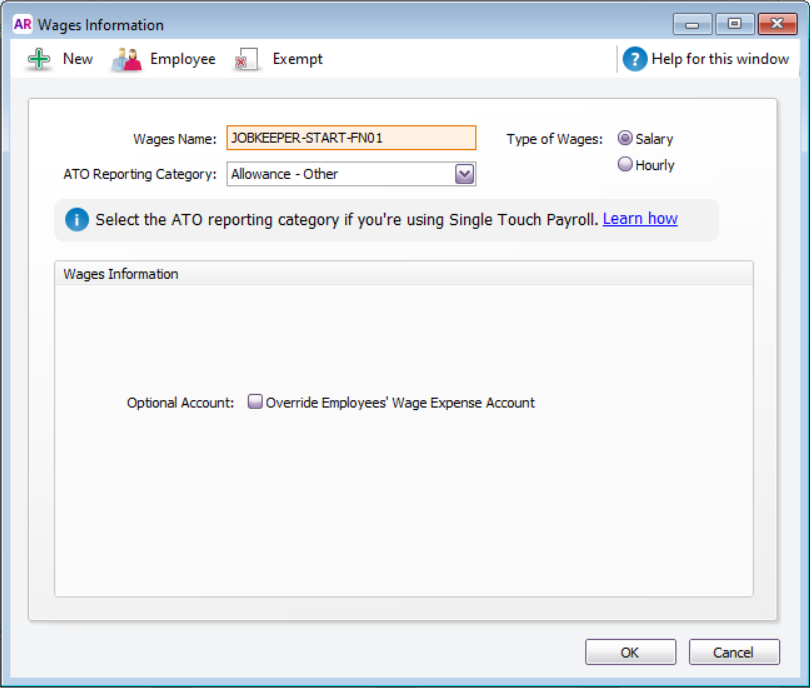
- For the Wages Name, enter this exact name: JOBKEEPER-START-FNxx, where xx refers to the fortnightly period during which you start making JobKeeper payments.
For example, if you’re paying your employee their first JobKeeper payment on 11 April, use JOBKEEPER-START-FN01 as the wages name (as the pay date falls within the ATO’s fortnightly period). The wage category name must match this (all capitals, with hyphens and no spaces) to ensure it’s accepted by the ATO for Single Touch Payroll reporting. See the following table for help.
| FN | If your pay date falls within | The pay item Name must be |
|---|---|---|
| 01 | 30/03/2020 - 12/04/2020 | JOBKEEPER-START-FN01 |
| 02 | 13/04/2020 - 26/04/2020 | JOBKEEPER-START-FN02 |
| 03 | 27/04/2020 - 10/05/2020 | JOBKEEPER-START-FN03 |
| 04 | 11/05/2020 - 24/05/2020 | JOBKEEPER-START-FN04 |
| 05 | 25/05/2020 - 07/06/2020 | JOBKEEPER-START-FN05 |
| 06 | 08/06/2020 - 21/06/2020 | JOBKEEPER-START-FN06 |
| 07 | 22/06/2020 - 05/07/2020 | JOBKEEPER-START-FN07 |
| 08 | 06/07/2020 - 19/07/2020 | JOBKEEPER-START-FN08 |
| 09 | 20/07/2020 - 02/08/2020 | JOBKEEPER-START-FN09 |
| 10 | 03/08/2020 - 16/08/2020 | JOBKEEPER-START-FN10 |
| 11 | 17/08/2020 - 30/08/2020 | JOBKEEPER-START-FN11 |
| 12 | 31/08/2020 - 13/09/2020 | JOBKEEPER-START-FN12 |
| 13 | 14/09/2020 - 27/09/2020 | JOBKEEPER-START-FN13 |
- For the Type of Wages, select the Salary option (regardless of whether your employees are salaried or hourly based).
- For the ATO Reporting Category, choose Allowance – Other. Here’s our example:
- Click Employee, select the employees who will be paid the JobKeeper payments, then click OK.
- Click OK to save the wage category.
If an employee becomes ineligible during the JobKeeper scheme, you’ll need to create a new wage category to inform the ATO.
3 Exempt the JobKeeper top-up category from accruing super
This task is only applicable if you’re not paying super on JobKeeper top-up payments. If you will be paying super on these payments you can skip this task. Take a look at these fortnightly pay examples to see what super is typically paid on:
| Regular fortnightly income | Fortnightly income with JobKeeper | You must pay super on | You can choose to pay super on |
|---|---|---|---|
| $1000 | $1500 | $1000 | $500 |
| $1500 | $1500 | $1500 | N/A |
| $3000 | $3000 | $3000 | N/A |
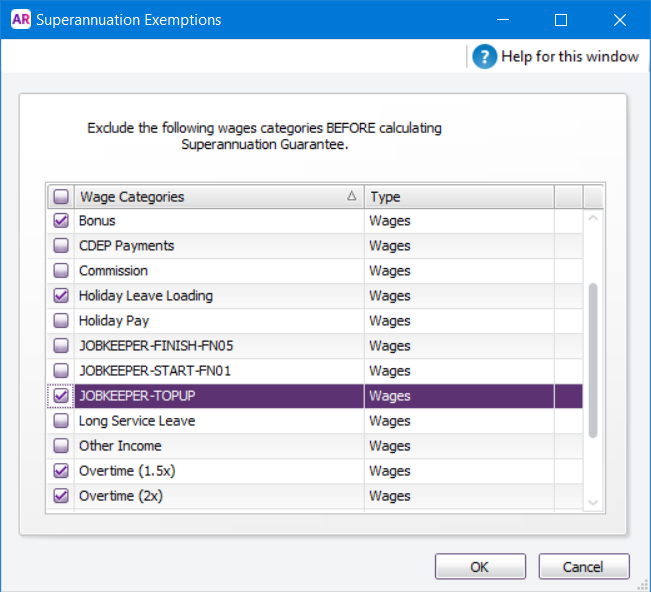
To stop super calculating on the JobKeeper top-up wage category
- Go to the Payroll command centre and click Payroll Categories.
- Click the Superannuation
- Click to open the Superannuation Guarantee
- Click Exempt.
- Select the JOBKEEPER-TOPUP wage category.
- Click OK, then click OK again to save these changes.
4 Do your first JobKeeper pay
The first pay you complete under the JobKeeper scheme will look quite similar to any other pay day, but with these changes:
- You’ll enter $0.01 against the JOBKEEPER-START-FNxx wage category for each employee you’re paying.
- You’ll increase the PAYG Withholding by 1 cent to balance the pay.
- If you’re paying an employee who’s earned less than the JobKeeper payment, or the employee has been stood down, you’ll enter a value against the JOBKEEPER-TOPUP wage category.
Let’s take you through it:
- Go to the Payroll command centre and click Process Payroll.
- Choose who you’re paying and the pay dates, then click Next.
- Click the zoom arrow
 to open an employee’s pay.
 - Take note of the amount shown against Base Salary or Base hourly wage category. This is typically the employee’s regular income and will help you work out how to record the JobKeeper payment.
- Enter $0.01 against the JOBKEEPER-START wage category. You need to do this because it won’t submit to the ATO if it has a zero dollar value.
- Increase the PAYG Withholding by 1 cent. This will balance out the 1 cent.
- Enter the employee’s pay.
-
If an employee is You'll need to being paid less than the JobKeeper payment Enter the hours or amount for the work they've done against the relevant wage categories, such as Base Salary or Base Hourly.
Enter the top-up amount (to bring their pay up to the required JobKeeper payment amount) against the JOBKEEPER-TOPUP wage category. Only enter the amount, not hours. This ensures leave won't accrue on the JobKeeper top-up.being paid more than the JobKeeper payment Enter their pay as you normally would against the relevant wage categories, such as Base Salary or Base Hourly. stood down (still employed
but not working)Enter the full JobKeeper payment against the JOBKEEPER-TOPUP wage category. Leave is required to be accrued on this payment (see the FAQ below for more details).
-
- Here are some examples:
- Example 1: Employee paid less than $750 per week
- Here’s an example of a casual employee who works 20 hours per week and whose pay is less than the JobKeeper amount ($750). For their 20 hours they earn $576.92 a week. Under JobKeeper, they’ll now earn $750 a week so we’ve put their extra $173.08 against the JOBKEEPER-TOPUP wage category ($576.92 + $173.08 = $750).
- Because this is their first JobKeeper payment, we also need to enter $0.01 against the JOBKEEPER-START wage category. To balance the pay, we also increase the PAYG Withholding by 1 cent (-$96.00 – $0.01 = -$96.01)

- Example 2: Employee paid more than $1500 per fortnight
- Here’s an employee whose weekly pay is more than the fortnightly JobKeeper amount ($1500). They normally earn $1742.31 a fortnight. Under JobKeeper, they’ll still be paid the same.
- So we’ll enter their pay as we normally would and record their pay against the relevant wage category, in this case Base Salary.
- But because it’s the first pay they’re receiving under the JobKeeper scheme, we’ll enter $0.01 against the JOBKEEPER-START wage category. To balance the pay, also increase the PAYG Withholding by 1 cent (-$440.00 – $0.01 = -$440.01)

- Example 3: Employee who is stood down
- Here’s an employee who has been stood down. Regardless of what they were earning while working, they’ll now receive the full JobKeeper payment.
- So in their fortnightly pay we’ll enter $1500 against the JOBKEEPER-TOPUP wage category.
- And because it’s the first pay they’re receiving under the JobKeeper scheme, we’ll enter $0.01 against the JOBKEEPER-START wage category. To balance the pay, also increase the PAYG Withholding by 1 cent (-$356.00 – $0.01 = -$356.01)

- When you’re done, click OK.
- Repeat steps 3 – 8 for each employee.
- Finish your pays as you normally would. Need a refresher?
After an employee’s first JobKeeper pay
If you’ve submitted the employee’s first JobKeeper pay to the ATO via Single Touch Payroll reporting, you can remove the JOBKEEPER-START wage category from them.
Like this:
- Go to the Payroll command centre and click Payroll Categories.
- On the Wages tab, click the JOBKEEPER-START wage category.
- Click Employee.
- Deselect the employees you’ve paid under the JobKeeper scheme.
- Click OK, then click OK again to save your changes.
You will now be able to process subsequent pays in a similar way to the first pay, but without using the JOBKEEPER-START wage category.
5 Receive the JobKeeper Payments from the Government
The JobKeeper reimbursements from the government will be deposited into your nominated bank account. Here’s how to record those payments in AccountRight.
If you use bank feeds
The payments from the government will appear in AccountRight when your bank feed transactions appear.
- If you’ve already recorded a Receive Money transaction for the deposit (as described below), you can match the bank feed transaction to it.
- If you haven’t already recorded a Receive Money transaction for the deposit, you can do so straight from the Bank Feeds window. When creating the Receive Money transaction, allocate the deposit to the income account we set up earlier (the steps below will show you what this means).
For details about how to work with bank feed transactions, see Approving a bank feed.
If you don’t use bank feeds, you’ll need to manually record a Receive Money transaction.
Thinking about becoming a client?
Book your free, no obligation consultation right now via our online booking system or get in touch to find out more
Already a client and want to get in touch?
Send us an email via our enquiry form or give us a call today